Systemy wbudowane - Laboratorium

uCLinux development

uCLinux=Linux for microcontrollers

Getting Started

Grupa dyskusyjna dot. programowania uCLinux i LPC2400
Lista mailingowa na stronie domowej projektu
Podręcznik użytkownika

Distribution Images

Description File
uLinux.bin
Image of uClinux system. Needed during booting.
(Files updated 2008-11-20)
(MD5 Checksum: 218998d9599073197fbe2d35c56c9b93)  Verify
uLinux.bin (1095kB)
romfs.img
Initial rom file system. Needed during booting.
(Files updated 2008-11-20)
(MD5 Checksum: b079279fc80283ceaf8663d6237e8015)  Verify
romfs.img (1947kB)
u-boot for 16-bit LPC2478 OEM Board running at 48 MHz
U-boot bootloader. Placed in internal FLASH memory of the LPC2478.
(Files updated 2009-01-09)
(MD5 Checksum (*.hex): 896706a2849988ed9fa1e32987dee594)  Verify
u-boot.hex (515kB)
u-boot for 16-bit LPC2478 OEM Board running at 72 MHz
U-boot bootloader. Placed in internal FLASH memory of the LPC2478.
(Files updated 2009-01-09)
(MD5 Checksum (*.hex): 968258e5896261312defc0165f8ff4f4)  Verify
u-boot.hex (515kB)
u-boot for 32-bit LPC2478 OEM Board running at 48 MHz
U-boot bootloader. Placed in internal FLASH memory of the LPC2478.
(Files updated 2009-01-09)
(MD5 Checksum (*.hex): d8c66eae31903ae8d7faf6e8225c0b9c)  Verify
u-boot.hex (515kB)
u-boot for 32-bit LPC2478 OEM Board running at 72 MHz
U-boot bootloader. Placed in internal FLASH memory of the LPC2478.
(Files updated 2009-01-09)
(MD5 Checksum (*.hex): e823ec205be68272961f493b47a296e9)  Verify
u-boot.hex (515kB)

Verifying downloaded files

We recommend that all downloaded binary files are verified before used. All binary files have their MD5 checksums listed next to the download link.

In Linux there is a md5sum command that can be used like this:


md5sum linux-2.6.5-ea_v1_0.diff.gz

The result will look like this:


66549bb68c2ffc0f0494754d33acbeb4   linux-2.6.5-ea_v1_0.diff.gz

Compare that number with the one found next to the file's download link on our support web. If the numbers don't match then try to download the file again (possibly with a different program). If you still get different checksums then please send an email to support so that we can correct the problem.

Windows users can get binary md5 programs from here, here, or here.

LPC2478 uClinux Resources

SDK > Introduction and installation

This section gives an introduction to the SDK, including installation details.

The LPC2478 OEM Board SDK is distributed as a virtual machine to be executed in VmWare Player, a free product from VmWare. VmWare Player is available for most Windows versions and a wide selection of Linux distributions. For those operating systems that aren't supported it is possible to download the source code and compile it yourself.

The reasons for using the VmWare Player are:

Downloading & Installing VmWare Player

The VmWare Player can be downloaded from http://www.vmware.com/download/player/. Fill in the requested information to start the download.

Execute the downloaded file to start the installation. When/If you are promted regarding "CD automatic play" select "Leave it as is".

Preparing the SDK

Select where you want the SDK to be installed and then unzip the EADevEnv_v3_1.

Running the SDK

Start the VmWare Player and, when prompted, point to the EA-dev.vmx file in the folder where you unzipped the SDK.

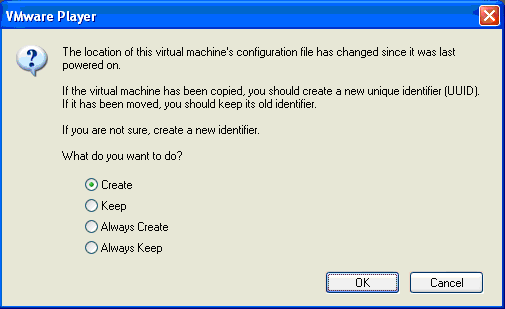
You will be greeted with a screen similar to this one:

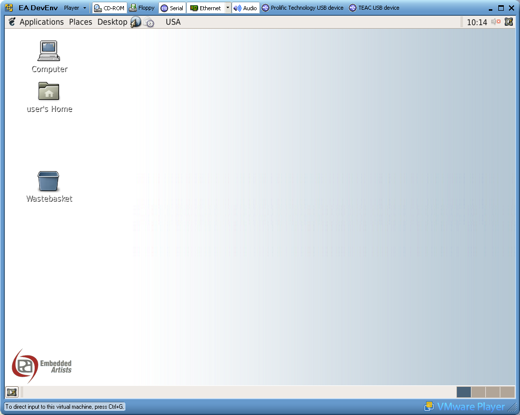
Selecte "Create" and press OK to generate a new identifier. (This screen will only appear the first time you start the SDK). The virtual machine will automatically login as the default user. When finished with the login procedure you will end up on the desktop:

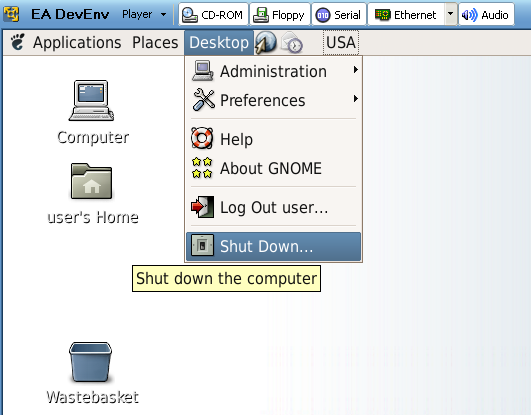
To shutdown the virtual machine you have two options. The first is by selecting Desktop->Shutdown

This will shutdown Linux and automatically close the Player. Next time you start the Player it will behave the same way as it did this time.

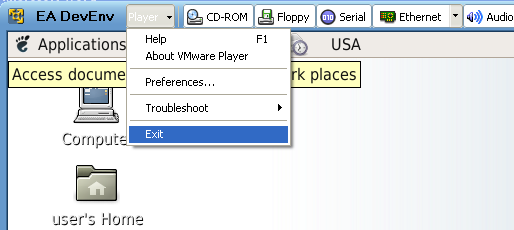
The second option is to just close the player

This will save the state of the virtual machine and when you start the Player next time you will end up with the same programs started as when you closed it ? very convenient.

Note: Sometimes the second option can cause you to loose your network connection when it is resumed. If it does then you have to restart the virtual machine to get it to work again. Desktop->Shut Down and then press Restart.

LPC2478 OEM Board Resources

Booting > Booting Options

This section explain the different ways for the u-boot to boot, i.e., how to retrieve the uClinux image files (i.e., uLinux.bin and romfs.img).

Booting via TFTP

Booting over TFTP is fast and easy. It's a simple protocol on top of the TCP/UDP/IP stack. The Ethernet interface is used for high-speed communication. This booting method is typically used during program development around the kernel itself and the core functionality (i.e., board specific drivers).

tftpboot a1000000 uLinux.bin
tftpboot a1800000 romfs.img
bootm a1000000

Note that there must be a TFTP server in the development system (typically your PC) that have access to the uClinux image files created when recompiling the kernel. It is recommended to set the TFTP server root directory to the image directory where the (uClinux) image files are produced, see the Installing TFTP server section for more information. This way there is no need to copy and move around the files.
If you are not working in the VMware Player Linux system you can install a TFTP server on your Windows PC. TFTPD32 is a good free program.

Also note that the IP address of both the uClinux system and where the TFTP server is must be set. If the default netmask is not correct, this must also be set. See example below where all environment variables are set and also saved.

setenv ipaddr 192.168.1.100
setenv serverip 192.168.1.3
setenv netmask 255.255.255.0
saveenv
Booting via MMC/SD

Another quick method to transfer a set of new image files is via a MMC/SD memory card. Just copy the (new) image files to the MMC/SD memory card and then insert the memory card in the OEM Base Board's memory card connector. Then instruct the u-boot to boot from the memory card with the commands below.

mmc
fatload mmc 0 a0008000 linux.bin
fatload mmc 0 a1800000 romfs.bin
go a0008000

To get an overview of the MMC/SD memory card, type:

flinfo

To list the content of the MMC/SD memory card, type:

fatls mmc 0

There is a known issue with the FAT file system implementation in uClinux and the u-boot. In general, uClinux/u-boot cannot read from memory cards formatted from a Windows™ machine. Read our decription how to format MMC/SD memory cards from a Linux host, for example the VMware Player system.

Booting via NAND FLASH

To boot from NAND FLASH run/type the following commands:

nand read a1000000 0 200000
nand read a1800000 200000 400000
bootm a1000000

This assumes that the two image files have been placed beforehand in the NAND FLASH memory at specific addresses in the FLASH memory; 0x00000000 for uLinux.bin and 0x00200000 for romfs.img. See example below where TFTP is used to download the image files.

nand erase
tftpboot a1000000 uLinux.bin
nand write a1000000 0 200000
tftpboot a1000000 romfs.img
nand write a1000000 200000 400000

Note that the offset and size in NAND must be aligned to 2048-bytes addresses.

Initial Environment Variables

There is a default setting of a number of environment variables in the u-boot. Below is a list of the pre-defined environment variables that exist and their default settings. There is a number of commands strings for updating the different memories in the system as well as booting.

tftp_boot=tftpboot a0008000 linux.bin;tftpboot a1800000 romfs.bin;
  go a0008000
nor_boot=cp.b 80000000 a0008000 200000;cp.b 80200000 a1800000 
  200000;go a0008000
nand_boot=nand read a0008000 0 200000;nand read a1800000 200000 
  400000;go a0008000
mmc_boot=mmc;fatload mmc 0 a0008000 linux.bin;fatload mmc 0 a1800000 
  romfs.bin;go a0008000
update_uboot=tftpboot a1000000 u-boot.bin;protect off 0 2ffff;erase 0 
  2ffff;cp.b a1000000 0 $(filesize)
update_nor=tftpboot a1000000 u-boot.bin;protect off 80000000 803fffff;
  erase 80000000 803fffff;cp.b a1000000 80000000 $(filesize);tftpboot 
  a1000000 romfs.bin;cp.b a1000000 80200000
update_nand=nand erase;tftpboot a1000000 linux.bin;nand write a1000000 
  0 200000;tftpboot a1000000 romfs.bin;nand write a1000000 200000 
  400000
ipaddr=192.168.1.100
netmask=255.255.255.0
serverip=192.168.1.3
ethaddr=00:1a:f1:00:00:00

In order to execute a command string, use the run command followed by the name of the environment variable containing the commands (as a string).

run commandString

Then a new u-boot version is downloaded in the system the old environment variables are kept. This is sometines not wanted, since the default settings can have been updated in the new versions. Check the description Resetting u-boot Environment Variables for a decription how to erase the current settings and get the default settings.

Controlling Autoboot

The u-boot has a so called autoboot feature. The startup message is listed below. If no character is received over the terminal within 3 seconds (see countdown below), the u-boot will execute a predefined command.

**********************************************
* LPC2478 OEM Board from Embedded Artists AB *
*              EA-version: 1.4               *
*          www.EmbeddedArtists.com           *
**********************************************
Booting (may take some time)...
U-Boot 1.1.6 (Feb 17 2007 - 09:10:30)
DRAM:  32 MB
Flash:  2.5 MB
NAND:  128 MiB
In:    serial
Out:   serial
Err:   serial
Hit any key to stop autoboot:  3 -> 2 -> 1 -> 0 

The predefined command is set with the bootcmd environment variable. The setting below is the default, i.e., to execute/run the command script named nand_boot.

setenv bootcmd run nand_boot

LPC2478 OEM Board Resources

SDK > Setting up a TFTP server

This section describe how to install and setup a TFTP server in the SDK. The TFTP server can be used for booting the uClinux system, i.e., transferring the two image files (uLinux.bin and romfs.img) to the system.

NOTE: The distribution you have received already have a TFTP server installed. In this case step 3 below might be of most interest since this step describes how to change the root directory of the TFTP server.

Installation instructions

Step 1: Start uour SDK, open a command prompt/termial and type (as root):

apt-get install tftpd

Step 2: Verify that the file /etc/inetd.conf has correct settings. The important row is the one for TFTP. If a TFTP row is missing, add the row below to the file:

tftp dgram udp wait nobody /usr/sbin/tcpd /usr/sbin/in.tftpd /src/tftp

Step 3: Change the root directory for the TFTP server to where the images are produced when compiling. The default is /srv/tftp (as seen above), but change this by setting the last part to:

/home/user/uClinux-dist-20070130/images/

Step 4: restart inetd by typing:

killall ?HUP inetd

TFTP will now work!

LPC2478 OEM Board Resources

Booting > Modifying/updating u-boot

This section contains information about how to compile a modified u-Boot and how to download the updated u-Boot to the OEM Board.

Prerequisites

First of all, you have to download the u-Boot v1.1.6. This can be found from ftp.denx.de or from the Sourceforget project repository.
Download and unpack.

Secondly you have to install ELDK v4.0. ELDK stands for Embedded Linux Development Kit. The ELDK includes the GNU cross development tools, such as the compilers (GCC v4.0), binutils, gdb, etc., and a number of pre-built target tools and libraries necessary to provide some functionality on the target system.
Full instructions about downloading and installing the ELDK can be found on: http://ftp.sunet.se/pub/Linux/distributions/eldk/4.0/arm-linux-x86/distribution/
It's also possible to download a CDROM iso file from: http://ftp.sunet.se/pub/Linux/distributions/eldk/4.0/arm-linux-x86/iso/

It's basically just the compiler that is needed for compiling the u-Boot.

Applying u-Boot patch

Secondly, you have to apply a patch to the source code tree with the modification done in order to adjust the u-Boot for the LPC2478 OEM Board.
Download the u-boot-1.1.6 and unpack (should have been done in the first step above). Change directory to u-boot-1.1.6 and type:

cat where_ever/u-boot-1.1.6-ea_070115.diff | patch -p1

This will apply the EA specific changes to the source code.
(note that the name of the patch can be different depending on what version you have.)

gunzip -c where_ever/u-boot-1.1.6-ea_20070105.diff.gz | patch -p1
Customizing the u-boot

The board specific configuration of the u-boot can be found in the ./include/configs/<board>.h file. <board> is in this case LPC2468OEM_Board.
This configuration file controls which commands to include in the u-boot. Consult the u-boot documentation for details about the different configuration settings (can be found in a readme-file in the u-boot source code).

If needed, make your modifications and move on the compinging the u-boot (see next section).

Compiling

Compiling is really simple. First change directory to u-boot-1.1.6. Then make sure the correct target board is selected and then actually compile. The two command lines below accompilish this:

make distclean
make LPC2468OEM_Board_config

To actually compile and create a u-boot program image, type:

make

Two files are created, named u-boot and u-boot.bin. The first is the elf-file which is not used unless you are debugging the u-boot itself. It is the *.bin file that is normally used. In some cases, this file must be converted to another format before downloaded into the internal FLASH of the LPC2478. It depends on the download tool used. Intel-HEX is for example a commonly used format for many tools.
To convert the *.bin file into a *.hex file, type the command below.

arm-linux-objcopy -I binary -O ihex u-boot.bin u-boot.hex 
Updating the u-boot

The resons for updating the u-boot is either if you have a new u-boot version or have accidentally erased the current u-boot (completely or replaced it with a non-functioning u-boot).

There are basically three ways to update the u-boot, which resides in the internal FLASH memory of the LPC2478.

  • ISP functionality in the LPC2478, i.e., downloading via UART #0.
     
  • JTAG, i.e., let the JTAG debugger update the internal FLASH memory of the LPC2478.
     
  • Via the u-boot itself. First download the binary file to (starting at) address 0xa1000000 and then unlock the internal FLASH memory area, erase it and finally copy (i.e., program) the downloaded file into the FLASH.

Let's investigate the last (and most common) option below. The u-boot commands below accomplish an update of the u-boot itself.

tftpboot a1000000 u-boot.bin
protect off 0 2ffff
erase 0 2ffff
cp.b a1000000 0 $(filesize)

The variable filesize is automatically set after tftpboot to the length of the downloaded program image file.

Note that it's the *.bin file that should be loaded (as opposed to the *.hex file). If the update command fails the u-boot program image in internal FLASH may be lost. In that case, only the two first options (JTAG or ISP) can be used to write the new u-boot program image into internal FLASH.
It can be a good idea to first test that the download process works by only downloading the new program image to try to run it without actually writing the new program image into internal FLASH. The two command lines below accomplish this.
This way, you always keep a known good u-boot in internal FLASH.
After testing that the new u-boot works/is correct, the commands above can be executed to actually write the new program image into FLASH.

tftpboot a1000000 u-boot.bin
go a1000000

The new u-boot image file can of course come from different sources. In the example above, it is transferred over Ethernet and the TFTP protocol. If this for some reason is not suitable a MMC/SD memory card can be used. Write the image file into the card and insert it into the LPC2478 OEM Base Board connector. Exchange the tftpboot command line above with the following two commands.

mmc
fatload mmc 0 a1000000 u-boot.bin

This will load the image file from the MMC/SD memory card into RAM (from where it can be copied into the internal LPC2478 FLASH).

Resetting u-boot Environment Variables

In some cases the environment variables must also be resetted when the u-boot is updated.
To erase all enviroment variables, type as below. Note that this will also erase the pre-programmed Ethernet MAC address. Make sure you have the sticker with the MAC address still available before erasing the environment variables.

protect off 7c000 0x7cfff
erase 7c000 7cfff

Press the reset button or type reset to restart the board. Note the startup message about an invalid checksum in the environment varibles, as copied below.

**********************************************
* LPC2468 OEM Board from Embedded Artists AB *
*              EA-version: 1.4               *
*          www.EmbeddedArtists.com           *
**********************************************
Booting (may take some time)...
U-Boot 1.1.6 (Feb 17 2007 - 09:10:30)
DRAM:  32 MB
Flash:  2.5 MB
NAND:  128 MiB
*** Warning - bad CRC, using default environment
In:    serial
Out:   serial
Err:   serial
Hit any key to stop autoboot:  3 

The default environment variables of the new u-boot are now active. The warning message will display every time during startup until the environment is actually saved. Type as below to accomplish this. Reset the board again and verify that the warning message is no longer displayed.

saveenv

To set the Ethernet MAC address again, set the environment variable 'ethaddr' with the MAC address that comes with the board. To set the address, type as below and replace the xx:xx:xx part with the last three octets in your unique Ethernet MAC address.

setenv ethaddr 00:1a:f1:xx:xx:xx
saveenv

LPC2478 OEM Board Resources

Resources > Patches

This section contains a number of patches for the system.

u-Boot patch

The current release builds on u-Boot v1.1.6.
Download the u-boot-1.1.6 and unpack. Change directory to u-boot-1.1.6 and type:

gunzip -c where_ever/u-boot-1.1.6-ea_v1_9_0.diff.gz | patch -p1
This will apply the EA specific changes to the source code.

For details about how to compile the u-Boot and how to download a new version, check the Booting section of these support pages.


Description File
u-boot-1.1.6-ea_v1_9_1.diff.gz
The patch for u-boot-1.1.6.
(Files updated 2008-11-19)
(MD5 Checksum: 93008d860f02b7ffc2a56c308d93c466)  Verify

Release notes:
  • NAND bug fixes (thanks to Gabriel Dubatti)
u-boot patch (144kB)
u-boot-1.1.6-ea_v1_9_1_incr1.diff.gz
Incremental patch for the u-boot. This patch must be applied after the 1.9.1 patch.
(Files updated 2009-01-09)
(MD5 Checksum: d415bf36041b52f53eb3439bde4945ed)  Verify

Release notes:
  • Added support for booting from USB memory stick
u-boot patch (18kB)

Development Environment 3.1

Incremental updates for EADevEnv 3.1

Incremental updates are to be applied after all the ordinary patches has been applied to the distribution.

Apply the incremental patch by changing directory to uClinux-dist and type:

gunzip -c where_ever/ea-v3_1_incr1.diff.gz | patch -p1


Description File
ea-v3_1_incr1.diff.gz
Incremental patch number 1 with updates to the v3.1 distribution.
(Files updated 2008-11-19)
(MD5 Checksum: ea470404391070178c561237f0b26c54)  Verify

Release notes:

  • MMC: Fix of a bug that caused problems when reading/writing large files.
  • Ethernet: Fix of a bug that caused Ethernet to not be enabled for early revisions of the LPC2468
  • Framebuffer: Fix of a bug that caused the kernel to crash when a display was not connected to the LPC2468 Base Board.
  • Joystick: A simple joystick driver for the joystick on the QVGA base board has been added. This driver is located outside of the kernel and is not using the input interface. It is similar to the ADC and PWM drivers.

Incremental patch (33kB)

uClinux patch for EADevEnv 3.1

This patch applies for uClinux-20070130 and Linux 2.6.21

Note 1: The documentation on these support pages has not been updated to reflect all the changes in this new patch. If you have any questions please direct them to the lpc2400 Yahoo group.

Note 2: Please use this version of the distribution with the updated u-boot patch (u-boot-1.1.6-ea_v1_9_0.diff.gz).

Note 3: If you have a version 3.0 of the Development environment you need to update the mkcramfs tool. The tool is available for downloaded below. You should replace the existing tool found in /usr/local/bin/mkcramfs.

Note 4: If you get the error message "Cannot find -lz" when compiling you need to install zlib on your system. The command "apt-get install zlib1g-dev" will install what you need.


Description File
ea-uClinux-081020.diff.gz
uClinux patch for the v3.1 Development environment distribution.
(Files updated 2008-10-20)
(MD5 Checksum: 62d7d48a5599bf2b9f3119e53960558b)  Verify

Release notes:

  • Board configurations for both the LPC2468 and the LPC2478 OEM Board
  • Framebuffer (video) driver is included for both LPC2468 and LPC2478
  • Touch controller driver
  • SPI driver
  • I2C driver
  • PCA9539 I2C client driver(16 bit I/O expander)
  • MC24LC256 I2C client driver (256kbit EEPROM)
  • Updated USB Host and USB device drivers
  • Updated RTC driver
  • Updated ethernet driver
  • Updated MMC driver
  • Enabled Nano-X (micro windows)
  • Enabled FTP client
  • Enabled FTP server
  • Enabled Web server
  • Enabled hwclock and date applications
  • Added a touch screen calibration application

uClinux patch (1792kB)
mkcramfs
Pre-compiled tool used for creating a cramfs file system.
(Files updated 2008-10-20)
(MD5 Checksum: ef7785123006bf8b9ed40c8eba85db9a)  Verify

mkcramfs (45kB)

How to apply the patch for EADevEnv 3.1

Unpack a clean uClinux distribution

tar -xzvf /cdrom/extra/uClinux-dist-20070130.tar.gz

Change directory to uClinux-dist

cd uClinux-dist

Remove Linux kernel directories

rm -r linux-2.*

Unpack Linux 2.6.21

tar -xzvf /cdrom/extra/linux-2.6.21.tar.gz

Rename kernel directory to linux-2.6.x

mv linux-2.6.21 linux-2.6.x

Apply the patch

gunzip -c your_path/ea-uClinux-081020.diff.gz | patch -p1

Select board configuration

make menuconfig

Select Vendor/Product Selection
Select EmbeddedArtists
Select LPC2478OEM_Board or LPC2468OEM_Board
Exit
Exit
Yes

Now you can compile

make

Development Environment 3.0

Incremental updates for EADevEnv 3.0

Incremental updates are to be applied after all the ordinary patches has been applied to the distribution.

Apply the incremental patch by changing directory to uClinux-dist-20070130 and type:

gunzip -c where_ever/ea-v3_0_incr1.diff.gz | patch -p1


Description File
ea-v2_3_incr1.diff.gz
Incremental patch number 1 with updates to the v3.0 distribution.
(Files updated 2008-07-13)
(MD5 Checksum: b01b3b755b27acb69cf3aa571d0cf668)  Verify

Release notes:
LPC2478

  • Process id: The process id list has been updated with the ID of the LPC2478 CPU.
  • ifconfig: Enabled status output from ifconfig.
  • inetd: Is now being invoked from the rc script.
  • Telnet and FTP servers have been enabled.
  • Other: Removed some temporary files.

Incremental patch (13kB)

Verifying downloaded files

We recommend that all downloaded binary files are verified before used. All binary files have their MD5 checksums listed next to the download link.

In Linux there is a md5sum command that can be used like this:

md5sum linux-2.6.5-ea_v1_0.diff.gz

The result will look like this:

66549bb68c2ffc0f0494754d33acbeb4   linux-2.6.5-ea_v1_0.diff.gz

Compare that number with the one found next to the file's download link on our support web. If the numbers don't match then try to download the file again (possibly with a different program). If you still get different checksums then please send an email to support so that we can correct the problem.

Windows users can get binary md5 programs from here, here, or here.

Podręcznik użytkownika (Getting Started): http://www.zsk.p.lodz.pl/~morawski/SCR&ES/Embedded/Getting_started_with_uClinux_A.pdf Linux Target Image Builder: http://www.ltib.org/

WYBRANE programy wykonane przez studentów